Friday, March 30, 2012

Happy Glazing!

Happy Friday!

Did you miss me? I sure miss you all. : - ) 
I wish I could tell you I have been on a luxurious vacation or on a big conference, but the truth is, it's been a rough week, but I was determine to post today. I have for you today a project updated. Do you remember my other vintage picture frame? I really wanted the frame to look more warmer and not so gold looking. So, I took out my handy dandy glazing and went to town. I really love the way it look and I can now finish up the next phase of this project. Did I mention I am a bit OCD? (wink) Seriously, I am. I can DIY a project and once it is done I will stare at it for months, till I figure out what is missing. I know; I need to just relax. God isn't finish with me yet. (smile)!

Here is the first fix:

More gold looking.
Here it is updated with the glazing.


I love how the glaze gives the color a warmer look. 
I didn't do anything to the paint I had on there already, but just added the glaze and let it sit for 10 minutes and wipe off. I also made sure the glaze got in the nooks and crannies.

 Here is a sneak peek on my next project. What color shall I paint this lovely piece? Any suggestions?


I appreciate you stopping by and I LOVE your SWEET comments! Have a great weekend!

Hugs,

Vanessa

Thursday, March 22, 2012

Urn Makeover

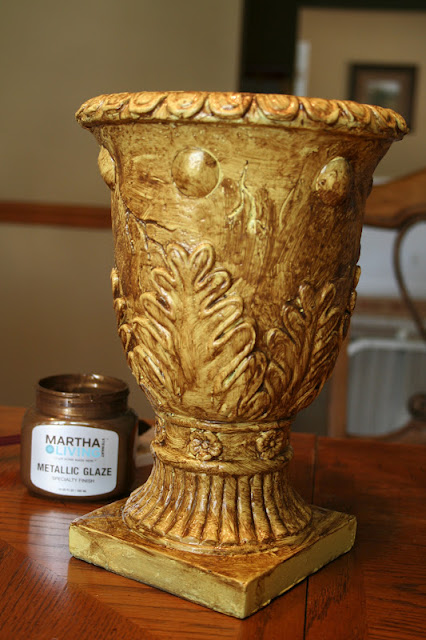
I had these lovelies urns that I used in my sweet girls birthday party and I just wanted to age them a bit. So, I took out my trusty Martha Living Metallic Glaze in Muscovado. Let me tell you, it turned these bright yellow urns to a vintage WOW! Take a look!

I changed my mind in using the gold metallic paint by FolkArt.
Once I spread the glaze I waited about 8 minutes before I wiped it off. Used a lint free cloth when wiping the glaze off. I also used my fingers to rubbed in the glaze into all the nooks and crannies.
Here is my lovely urn in all her glory! : )

I just love how the urns turned out and of course I am not done with them, so come by and see what I add to these lovelies next. Thanks for stopping by and I LOVE to HEAR from you, so leave a comment. Have a great weekend.

Hugs,
Vanessa

Tuesday, March 20, 2012

Picture Perfect!

I am finally finished! Yippee! Seriously, so much is going on, but I realized when I am doing DIY projects its helps clear my mind. Without further ado here is an update on my antique frame and fork and spoon


This project turned out the way I envisioned and I am so grateful my mom gave me these lovely fork and spoon. I plan on keeping these lovelies around for another 40+ years. : - ) 
Thank you for stopping by and hope you are inspired to turned your old pieces into lovely beauties. I LOVE your Kind comments, so drop me a line. 

Hugs, 

Vanessa

Tuesday, March 13, 2012

Vintage Frame from Italy

I was shopping around for a an old picture frame for two months for a project I wanted to use it for. Its was hard to fine what I was looking for, but I knew the look and the feel I was going for. This frame is everything I wanted and I can not wait to show you what I am going to use it for. The frame has some markings on the back and to be honest, I love the idea it came from Italy and the craftsmanship on this frame is beautiful.  It use to hold a artist's painting from Italy, but to no avail I couldn't figure out anymore information. If anyone has knowledge in this area, please do share.

Here is the before:


The name is Santo Ficara.

I love this wooden mat. I was going to replace the fabric, but I left it on, because it kept the old vintage look I was going for.
I am loving the metallic glaze. Its a lovely color.
Here is the vintage frame all fixed up:

Spray painted the frame ivory.
Brushed on the glaze all over the frame and I let it sit for about 5 minutes.
Wiped off with a lint free cloth.
The resulted are just lovely! 
I love how the mat makes the frame look vintage.


Come back to see what I am going to hang inside this lovely vintage frame. I appreciate you stopping by and I LOVE your SWEET comments. Have a great week.

Hugs,

Vanessa